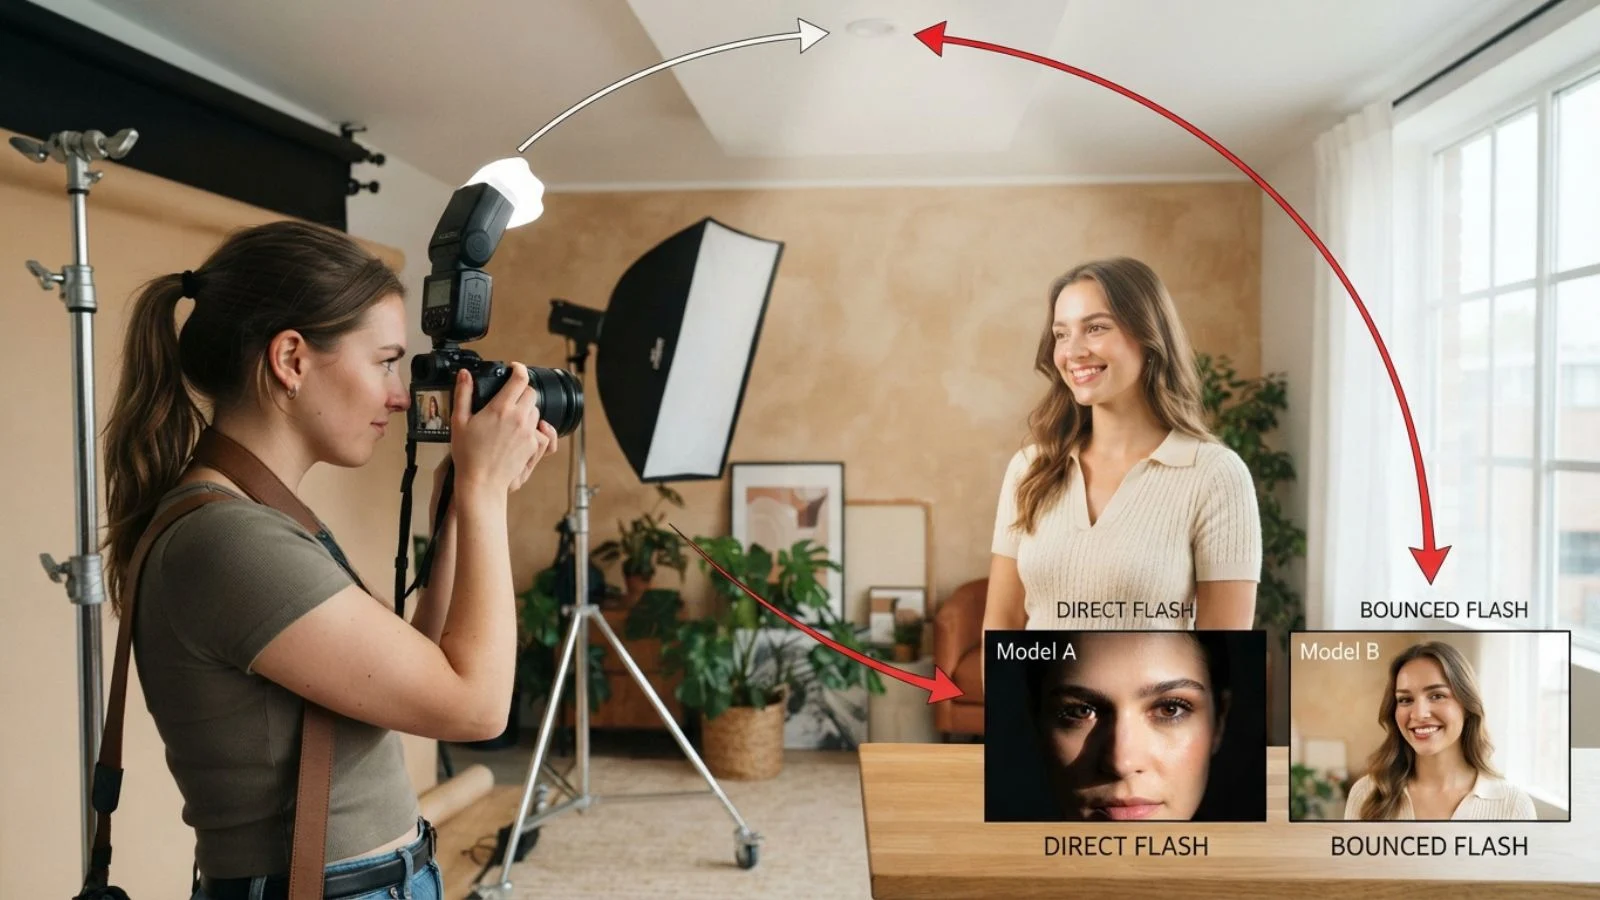
Flash photography has a bad reputation. Mention “using flash” to most beginner photographers and you’ll get wince visions of harsh, washed-out faces, deer-in-headlights red-eye, and that unmistakable “amateur snapshot” look.
So most people avoid it entirely, cranking up their ISO in dim rooms or giving up on shots that desperately need more light.
But here’s the truth: flash isn’t the problem. Not knowing how to use it is.
In the hands of a photographer who understands it, flash is one of the most powerful creative tools available capable of freezing fast motion, sculpting dramatic portraits, filling harsh shadows on a sunny day, and rescuing photos that would otherwise be unusable in low light.
This guide breaks down everything you need to know, from the basic mechanics of how flash works to advanced multi-light setups, so you can finally shoot with confidence instead of fear.
How Flash Works (The Fundamentals)
At its core, flash is a burst of artificial light lasting a tiny fraction of a second, often somewhere between 1/1,000 and 1/20,000 of a second. That brief duration is exactly what gives flash its superpower: the ability to freeze motion that would otherwise blur under continuous light, whether that’s a splashing water droplet or a sprinting athlete.
Unlike continuous light sources (lamps, LED panels, or the sun), flash fires instantaneously and only during the moment of exposure. This makes it fundamentally different to work where you can’t simply look at the scene and see exactly how the light will fall, the way you can with a lamp or window light.
One key concept to understand early is the guide number (GN), a numerical rating that tells you how powerful a flash unit is. A higher guide number means the flash can effectively light a subject from farther away, or allow a smaller aperture at the same distance. You can use the guide number to calculate the correct aperture for a given flash-to-subject distance, or vice versa, which is especially useful when working in full manual mode.
Color temperature also matters. Most flashes are calibrated to around 5,500K, matching daylight which is why flash-lit photos can look mismatched or “off” when mixed with warmer indoor lighting like tungsten bulbs, something we’ll cover in more detail later.
Types of Flash Equipment
Not all flashes are created equal, and choosing the right one depends on what you’re shooting.
Built-in/pop-up flash comes standard on many cameras and is the most limited option. It’s small, low-powered, fires straight at your subject, and can’t be angled making it prone to the harsh, flat look flash is often criticized for. It’s convenient in a pinch but not ideal for serious work.
On-camera speedlights are dedicated flash units that mount to your camera’s hot shoe. They’re far more powerful than built-in flash, and crucially, most models let you tilt and swivel the head, opening the door to bounce flash techniques covered later in this guide.
Studio strobes and monolights are the heavyweights, designed for controlled environments like studios. They offer significantly more power and recycle faster between shots, usually paired with light stands and modifiers for professional-level portrait or product work.
Ring flash and macro flash units circle the lens itself, producing even, shadowless light ideal for macro photography, medical/dental imaging, or a distinctive fashion-photography look.
Smartphone flash is essentially a small LED light and behaves very differently from a true flash; it’s continuous rather than an instantaneous burst, and far weaker, so most techniques here won’t translate directly.
Core Camera Settings
Flash photography adds a second exposure system on top of your normal settings, and understanding how they interact is essential.
Sync speed is the fastest shutter speed at which your camera can fully sync with a flash typically around 1/200s or 1/250s on most cameras. Go faster than this in standard flash mode and you’ll capture a partial black band across your frame, caused by the shutter curtains not fully opening together.
This is where flash exposure gets split into two separate controls. Aperture primarily governs how much flash light reaches your sensor; a wider aperture (like f/2.8) lets in more flash light than a narrower one (like f/11). Shutter speed, meanwhile, mostly controls how much ambient (existing) light is recorded, since the flash burst itself is nearly instantaneous regardless of shutter speed. ISO affects both, amplifying whatever light flash or ambient reaches the sensor.
This split is powerful once you grasp it: you can darken or brighten your background independently of your flash-lit subject just by adjusting shutter speed, without touching the flash at all.
For camera mode, Manual gives you full control over both ambient and flash exposure, ideal once you’re comfortable. Aperture Priority with flash lets the camera handle shutter speed for ambient light while you and the flash’s TTL system handle subject exposure, a good starting point for beginners before graduating to full manual control.
Flash Sync Modes
Beyond basic exposure, most cameras and flashes offer several sync modes that change when and how the flash fires relative to your shutter.
Front-curtain (first-curtain) sync is the default setting on most cameras. The flash fires at the very start of the exposure, immediately after the shutter opens. For fast shutter speeds this rarely matters, but at slower speeds with a moving subject, it can create an unnatural effect of motion trails appearing to stretch out in front of the subject, as if it’s moving backward.
Rear-curtain (second-curtain) sync fixes this by firing the flash right before the shutter closes, at the very end of the exposure. Any motion blur trails behind the subject instead, producing a far more natural sense of movement, a favorite technique for creative shots involving moving lights, like car light trails or dancers.
High-speed sync (HSS) solves the sync-speed limitation mentioned earlier. Instead of a single instantaneous burst, HSS pulses the flash rapidly throughout the entire exposure, allowing you to shoot at shutter speeds far faster than your camera’s normal sync speed. This is essential for using flash to fill in shadows on a bright sunny day while still keeping a wide aperture for shallow depth of field.
Slow sync pairs flash with a slower shutter speed, letting more ambient light into the frame useful for balancing a flash-lit subject against a dim, atmospheric background rather than a pitch-black one.
Red-eye reduction mode fires a quick pre-flash to shrink the subject’s pupils before the main flash, though it’s largely fallen out of favor given its tendency to cause blinking.
Light Quality: Modifying Your Flash
Once you understand exposure and sync, the next skill is controlling how the light itself looks, arguably the single biggest factor separating amateur flash photos from professional ones.
Hard light vs. soft light is the foundational concept here. A small, direct light source (like a bare on-camera flash) produces hard light: strong contrast, sharp-edged shadows, and unflattering detail on skin. A large, diffused light source produces soft light: gentle transitions and flattering, even illumination. The size of the light relative to the subject, not the power, determines softness.
Bounce flash is the easiest way to soften on-camera flash. Angling the flash head toward a ceiling, wall, or nearby surface turns that surface into a large, indirect light source, dramatically softening shadows. White or neutral-colored surfaces work best to avoid unwanted color casts.
Diffusers and flash caps small plastic or fabric attachments that fit over the flash head scatter light directly, useful when no bounce surface is available.
Softboxes and umbrellas, used with off-camera flash, are the professional standard for large, soft, controllable light, especially in portrait work.
Bounce cards and reflectors redirect or fill in light, often used alongside bounce flash to add a catchlight in the eyes.
Gels are colored, translucent filters placed over the flash used either to correct color temperature (matching flash to tungsten or fluorescent ambient light) or for creative colored lighting effects.
On-Camera vs. Off-Camera Flash
On-camera flash is convenient, but it has an inherent limitation: because the light source sits directly above (or right next to) the lens, it produces flat, front-on lighting with almost no sense of shape or dimension. Shadows fall directly behind the subject, straight into the frame, and there’s little you can do about the angle of light, only its power and diffusion.
Moving flash off the camera solves this. Positioning your light source to the side, above, or at an angle to your subject introduces shadow and depth, giving photos a far more three-dimensional, professional quality.
There are two main ways to trigger an off-camera flash. Sync cords physically connect the flash to the camera, reliable, but limiting in terms of distance and mobility. Wireless triggers are far more common today, splitting into two types: optical triggers, which use a flash of light to fire a secondary flash (simple but line-of-sight dependent), and radio triggers, which use radio frequency signals for far more reliable, longer-range, obstruction-free triggering.
A basic one-light setup, a single off-camera flash, often modified with an umbrella or softbox and placed at roughly a 45-degree angle to the subject, is the ideal starting point for anyone learning off-camera flash, and can produce results rivaling far more elaborate setups.
Once comfortable, multi-light setups add a key light (the main source), a fill light (softening shadows from the key), and a rim or hair light (separating the subject from the background) the building blocks of classic portrait lighting.
Flash in Different Lighting Conditions
How you use flash changes significantly depending on the ambient light you’re working against.
In low-light or indoor settings, flash often becomes the primary light source rather than a supplement. Here, balancing flash power against a slower shutter speed lets you retain some warmth and detail from the room itself, rather than plunging the background into total darkness, a common beginner mistake covered in more detail later.
Filling flash in bright sunlight might seem counterintuitive, but it’s one of the most valuable flash techniques. Harsh midday sun creates deep, unflattering shadows under eyes and chins. A touch of fill flash often dialed down significantly below full power lifts those shadows without overpowering the natural light, producing a far more polished result than sunlight alone.
Backlit subjects, such as someone standing in front of a bright window or sunset, present a classic exposure dilemma: expose for the background and the subject goes dark, or expose for the subject and the background blows out. Flash solves this by lighting the subject directly while the camera exposes the background.
Nighttime and long-exposure flash photography combines a properly exposed flash burst with a slow shutter speed, capturing both a sharp, flash-lit subject and ambient light trails or ambient …
Mixed lighting, such as flash combined with tungsten or fluorescent ambient light, often requires gels on the flash to match color temperatures otherwise, you’ll get an unnatural split between warm and cool tones within the same image.
Flash for Specific Photography Genres
Different types of photography call for different flash approaches.
Portrait photography benefits most from classic off-camera lighting patterns. Rembrandt lighting creates a small triangle of light on the shadowed cheek, producing a moody, dimensional look. Butterfly lighting, with the flash positioned high and centered above the camera, creates a small shadow under the nose, a favorite for glamour and beauty shots. Split lighting places the flash to the side, illuminating exactly half the face for dramatic, high-contrast portraits.
Event and wedding photography demands speed and flexibility. Bounce flash is invaluable here, especially in reception halls with varying ceiling heights and colors. A flash bracket, which raises the flash above the lens axis, also helps minimize harsh shadows when shooting vertically.
Street photography with flash is a bold, stylistic choice often deliberately harsh and direct, associated with photographers who use flash to create a gritty, candid, documentary feel rather than a polished one.
Action and sports photography leans on flash’s ability to freeze motion at extremely short durations, particularly useful in dim gyms or arenas where shutter speed alone can’t stop movement without underexposing the shot.
Product and macro photography typically favors soft, even, shadow-controlled lighting often using multiple small flashes, diffusion, and sometimes ring flash to eliminate unwanted shadows on small subjects.
Group photos and large scenes require enough flash power (or multiple flashes) to evenly cover a wide area, since a single small flash often can’t light an entire group consistently from edge to edge.
Common Flash Mistakes and How to Fix Them
Most bad flash photos come down to a handful of recurring, fixable problems.
Harsh, direct “deer in headlights” look happens when flash fires straight at a subject with no diffusion. The fix is simple: bounce the flash, diffuse it, or move it off-camera to soften and angle the light.
Red-eye occurs when flash light reflects off the retina, common in dim rooms with dilated pupils. Moving the flash off-camera even slightly eliminates it almost entirely, since the light no longer travels the same path as the lens.
Blown-out subjects with dark backgrounds happen when flash power overwhelms a subject at close range while ambient light in the background is too dim to register. Lowering flash power, increasing distance, or slowing the shutter speed to let in more ambient light all help balance the exposure.
Underexposed, “black hole” backgrounds are a variation of the same issue often the result of using too fast a shutter speed, which cuts off ambient light while the flash still lights the foreground subject fine.
Visible shadows behind subjects appear when a subject stands close to a wall with direct flash. Moving the subject farther from the wall, or angling the flash, softens or eliminates the shadow.
Color casts occur when flash’s daylight-balanced light mixes with warm indoor lighting. Correcting white balance in-camera or using gels on the flash resolves the mismatch.
Finally, overpowering ambient light unintentionally killing off a scene’s natural mood is usually fixed by simply dialing back flash power.
Advanced Techniques
Once the fundamentals are solid, a few advanced techniques open up significantly more creative control.
Balancing flash with ambient light, often called “dragging the shutter,” involves deliberately using a slower shutter speed alongside flash to let more of the existing ambient light into the frame. This technique is what separates flash photos that look artificially lit from ones where the flash blends naturally into the scene retaining warm evening skies, glowing city lights, or the ambiance of a dim restaurant, rather than plunging everything but the subject into black.
Multiple flash setups and light ratios take portrait lighting further, using two or more flashes at different power levels to control contrast. The ratio between your key light and fill light determines how dramatic or soft the final image looks; a higher ratio produces bold, contrasty results, while a lower ratio flattens shadows for a softer, more even look.
Stroboscopic or multi-flash effects fire a flash repeatedly during a single long exposure, capturing multiple “frozen” moments of a moving subject within one frame, a striking effect often used for dance, sports, or action sequences.
Creative gel work goes beyond color correction, using bold colored gels on background or accent lights to add stylized pops of color, a popular technique in music and event photography.
Using flash for silhouettes flips the usual goal entirely, placing flash behind a subject rather than in front, deliberately underexposing the subject itself while a bright, evenly lit background does the work, creating bold, graphic shapes.
Equipment Recommendations
You don’t need a large budget to start shooting with flash effectively; the right basics go a long way.
Entry-level speedlights are the natural starting point. Look for a model with a tilting and swiveling head (essential for bounce flash), TTL compatibility for automatic metering while you learn, and a reasonably fast recycle time so you’re not waiting between shots. Many manufacturers offer both their own branded flashes and well-regarded third-party alternatives at a lower price point, often with nearly identical core functionality.
Modifiers make an outsized difference for relatively little cost. A simple flash diffuser or bounce card is inexpensive and immediately softens on-camera light. For off-camera work, a small collapsible softbox or shoot-through umbrella is one of the best value purchases a beginner can make, both dramatically improving light quality without requiring studio-level investment.
Trigger systems matter once you move flash off-camera. Basic optical triggers are budget-friendly but limited by line-of-sight. Radio triggers cost more but offer far greater reliability, range, and consistency worth the investment as soon as off-camera flash becomes a regular part of your workflow.
Budget vs. professional kits ultimately comes down to how seriously you plan to pursue flash photography. A single speedlight, one modifier, and a basic trigger is enough to learn every technique in this guide. Professional multi-light kits with monolights, stands, and advanced modifiers are worth considering only once you’ve outgrown the flexibility of a simpler setup.
Practice Exercises
Flash photography is a skill best learned through deliberate practice rather than reading alone. These exercises build confidence in a logical progression.
Start with a bounce flash indoors. Set your camera to Aperture Priority or Manual, mount your flash, and practice bouncing it off different surfaces a white ceiling, a nearby wall, a bounce card. Compare the results against direct, unmodified flash to train your eye for the difference in shadow quality.
Practice filling flash outdoors on a sunny day. Photograph a subject in harsh midday light, first without flash, then with flash exposure compensation dialed down two or three stops below full power. Notice how subtly filled shadows can transform an otherwise unflattering shot.
Experiment with shutter speed and ambient balance. In a dim room or at dusk, keep your flash power constant while changing only your shutter speed across several shots. This isolates exactly how shutter speed affects the background independently of your flash-lit subject, one of the most important lessons in this entire guide.
Move your flash off-camera. Using even a basic sync cord or inexpensive trigger, try lighting a subject from a 45-degree angle rather than straight-on, and observe the added dimension and shadow detail.
Suggested starting settings for indoor bounce flash: f/4, ISO 400, 1/125s shutter speed, TTL flash metering. Adjust from there based on results.
Conclusion
Flash photography has a reputation problem, not a substance problem. The harsh, washed-out, “amateur” look so many people associate with flash isn’t an inherent flaw of the tool, it’s simply the result of using it without understanding.
What’s actually happening: the physics of light, the relationship between aperture and shutter speed, and the difference between hard and soft light.
Once those fundamentals click, flash stops being something to avoid and becomes one of the most versatile tools in your kit. It freezes fast motion no continuous light can match.
It rescues portraits from harsh midday shadows. It transforms a dim, underlit room into a properly exposed scene.
And in the hands of a photographer comfortable with off-camera positioning and modifiers, it becomes a genuine creative instrument capable of the same dramatic, dimensional lighting seen in professional studio portraits.
The path there doesn’t require expensive equipment or overnight mastery. A single speedlight, a cheap diffuser, and a willingness to experiment with bounce surfaces and shutter speeds will teach you more than any amount of reading alone.
Work through the progression outlined in this guide starting with simple bounce flash, then fill flash, then ambient balancing, then off-camera lighting and each new skill will build naturally on the last.