There’s something irresistibly charming about a goose that long curving neck, the confident waddle, the slightly indignant expression that seems to say “I own this pond.”
If you’re sketching for fun working on a wildlife art series or just looking to add a new bird to your drawing repertoire geese are a fantastic subject to practice.
They might look intimidating at first with their elongated necks and layered feathers but once you break them down into simple shapes drawing a goose becomes much more approachable even for beginners.
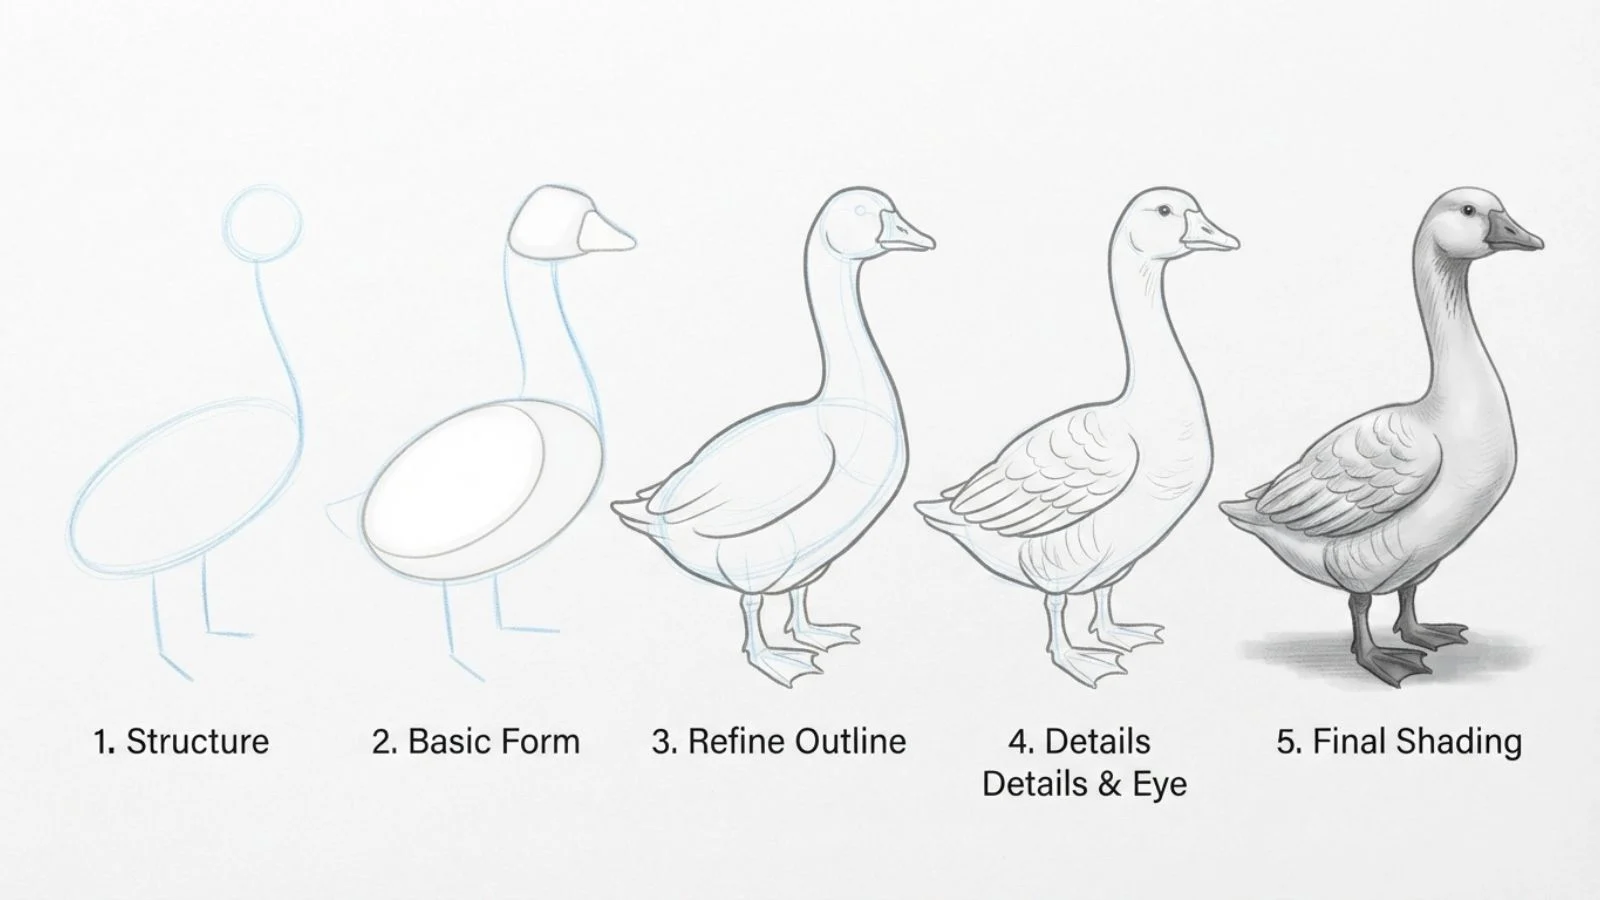
In this guide we’ll walk through everything from basic anatomy and construction shapes to feather detail shading and different poses so you can go from a blank page to a convincing goose drawing in a handful of clear steps.
Understanding Goose Anatomy & Reference
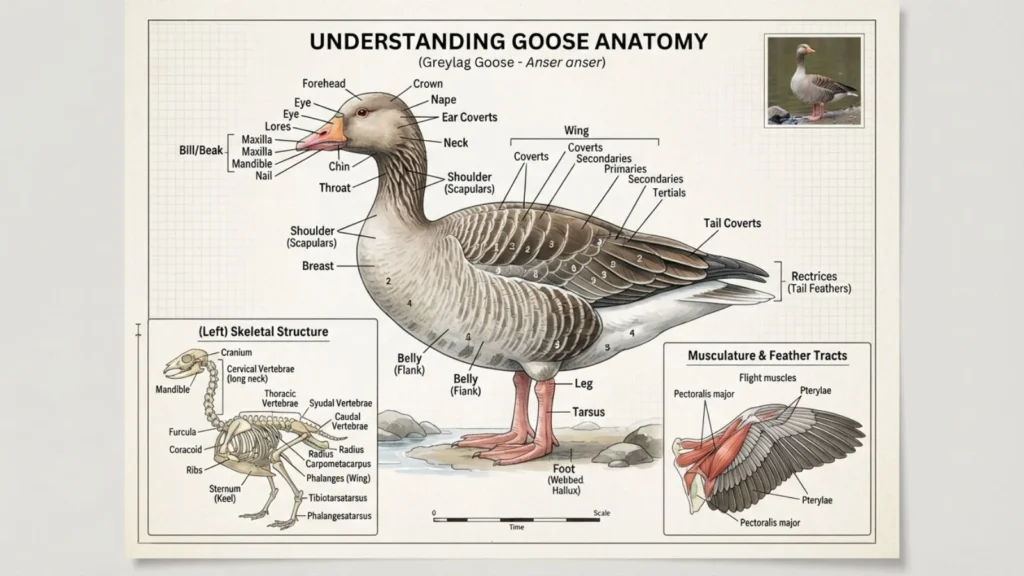
Before you put pencil to paper it helps to understand what actually makes a goose look like a goose. At its core a goose’s body can be broken down into a few key shapes and proportions: a rounded egg-like body, a smaller oval head and that unmistakable long curved neck connecting the two in a graceful “S” shape. This neck is arguably the most defining feature of a goose’s silhouette, get the curve right and the rest of the drawing tends to fall into place.
Beyond the basic shapes pay attention to a few key anatomical landmarks: the bill which is typically flattened and slightly rounded at the tip; the eyes set relatively high and close to the base of the bill; the wings which fold neatly along the back when at rest; the tail short and slightly upturned; and the legs and webbed feet positioned centrally under the body for balance.
It’s also worth noting that not all geese look alike. A Canada goose has a distinctive black head and neck with a white chinstrap marking while a snow goose is almost entirely white with black wingtips and domestic geese often have thicker necks and bulkier bodies. Choosing a species early on will help keep your reference gathering focused.
Speaking of references, don’t skip this step. Collect photos from multiple angles, front side in-flight swimming since geese move and pose in ways that are easy to get wrong from memory alone.
Basic Shapes & Gesture
With your anatomy reference in mind it’s time to start sketching. Begin loosely this stage isn’t about detail it’s about capturing the overall gesture and proportion of the goose before committing to any hard lines.
Start by drawing an oval for the body angled slightly depending on the pose you’re going for. If the goose is standing upright and alert, the oval should sit more vertically; if it’s leaning forward to feed or swim, angle it closer to horizontal. Keep this shape light and loose since you’ll likely need to adjust it as you build out the rest of the drawing.
Next add a smaller circle or oval above and in front of the body for the head. The size should be noticeably smaller than the body, roughly a third to a quarter of its size depending on the species and your desired style.
Now comes the most important part: the neck. Connect the head to the body with a curved line that flows in an “S” shape. This curve is what gives a goose its elegant alert posture so take your time here. A stiff straight neck is one of the most common mistakes beginners make and it can flatten the whole drawing.
Finally sketch a simple line for the ground and rough placement marks for where the legs will meet the body establishing the goose’s stance whether standing sitting or swimming before moving into a more defined structure.
Building the Structure

With your basic gesture in place it’s time to add the structural details that will start to bring your goose to life. This is where the drawing shifts from a rough gesture into something recognizably goose-shaped.
Begin with the beak. Sketch it extending from the front of the head as a flattened slightly rounded shape not pointed like a songbird’s beak but broader and more paddle-like. Pay attention to length relative to the head size and lightly mark the nostril position toward the upper portion of the beak.
Next place the eye. It should sit relatively high on the head and fairly close to the base of the beak giving the goose its characteristically alert expression. A small circle is enough at this stage; you’ll refine it later.
Now move to the wings. Sketch a rounded elongated shape along the side of the body following the curve of the back. If the wings are folded (the most common resting pose) they should taper toward the tail.
Add the legs and feet next positioned centrally beneath the body for balance. Sketch simple webbed shapes for the feet if the goose is standing for a swimming pose you can skip the legs entirely and imply the body sitting low in the water instead.
Finally sketch the tail as a short slightly upturned shape at the rear of the body completing the basic structural framework.
Refining the Outline
With the structural framework in place it’s time to clean things up and start committing to firmer lines. This step is all about transforming your loose construction sketch into a polished confident outline.
Start by going over your basic shapes and erasing any unnecessary construction lines: the guide circles for the head and body, the rough placement marks for the legs and any stray gesture lines you no longer need. Work carefully so you don’t lose the underlying structure you’ve already built.
Next focus on smoothing out the neck curve. This is the single most important line in the entire drawing so take your time to make it flow naturally rather than looking segmented or jointed. A good goose neck should read as one continuous graceful sweep from head to shoulders.
From there refine the chest and body contour. Instead of a plain oval, add subtle variation: a slightly fuller chest and a gentle taper toward the tail to give the body more natural volume and weight.
This is also the stage where you’ll want to decide on your overall style direction. If you’re aiming for realism keep proportions accurate and anatomically grounded. If you prefer a more stylized or cartoon approach you can exaggerate features like the eyes’ neck curve or body roundness for extra charm and personality.
Adding Feather Details
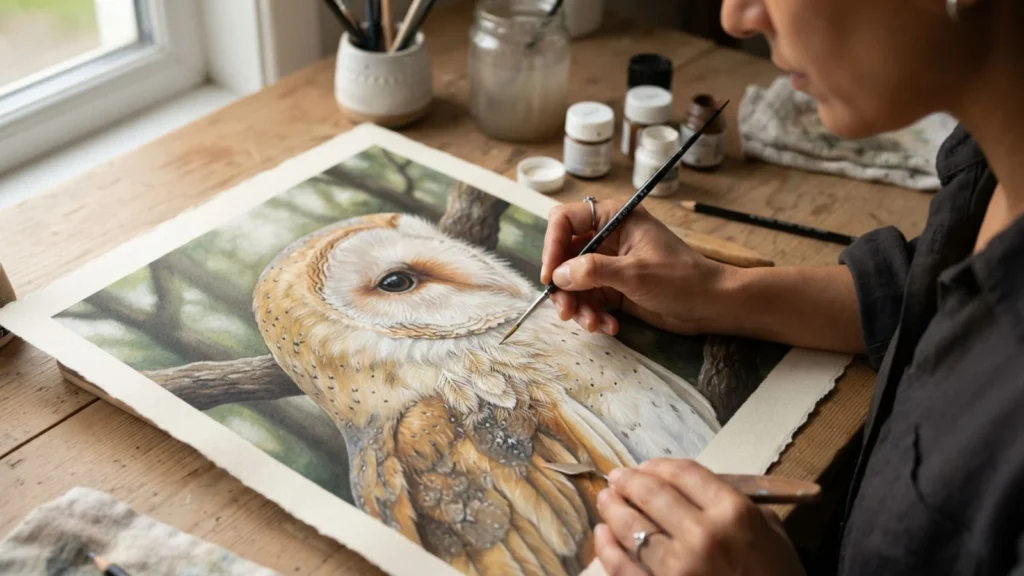
Once your outline is clean and confident it’s time to bring in the texture that really sells the drawing as a goose rather than a generic bird shape. Feathers can seem intimidating but they become manageable once you think of them in layered groups rather than individual strokes.
Start with the wings since they have the most visually distinct feather structure. Break the wing down into three main groups: the coverts (small overlapping feathers near the shoulder) , the primaries (longer flight feathers at the wing’s edge) and the secondaries (mid-length feathers between the two). Draw these as overlapping curved shapes layering each row slightly over the one below it similar to roof shingles.
Next move to the body. Rather than covering the entire goose in uniform detail, use short curved strokes that follow the direction of the body’s contour; feathers generally flow backward and downward from the head toward the tail. Keep areas like the belly and chest slightly smoother since down feathers there are finer and less defined than wing feathers.
Pay attention to the neck as well. Feather direction here should follow the curve you established earlier with small strokes flowing along the “S” shape rather than straight down which helps reinforce the neck’s natural bend.
Leave the bill eyes and feet feather-free since these areas are smooth and benefit from contrast against the textured body.
Shading & Dimension
With your feather details in place shading is what will finally give your goose a sense of volume and realism turning a flat drawing into one that looks like it has real form and weight.
Start by deciding on a light source. This single decision determines where every shadow and highlight will fall so pick a direction (upper left is a common natural-feeling choice) and stick with it consistently throughout the drawing.
Next identify the core shadows: the darker areas on the side of the body opposite your light source typically along the lower belly underside of the neck and beneath the folded wing. Use light layered pencil strokes or cross-hatching to build these shadows gradually rather than committing to dark tones too quickly.
Don’t forget to cast shadows. If your goose is standing, add a soft shadow beneath its feet on the ground. If it’s swimming, consider a subtle reflection in the water along with slightly darker shading where the body meets the waterline.
For the feathered areas use your shading to reinforce the layered texture you built in the previous step, slightly darker tones where feather groups overlap helps sell depth and dimension.
Finally add small highlights to the bill and eye. A tiny reflected highlight on the eye brings the goose to life while a subtle sheen along the top of the bill adds a polished lifelike finish to an otherwise matte surface.
Drawing Geese in Different Poses
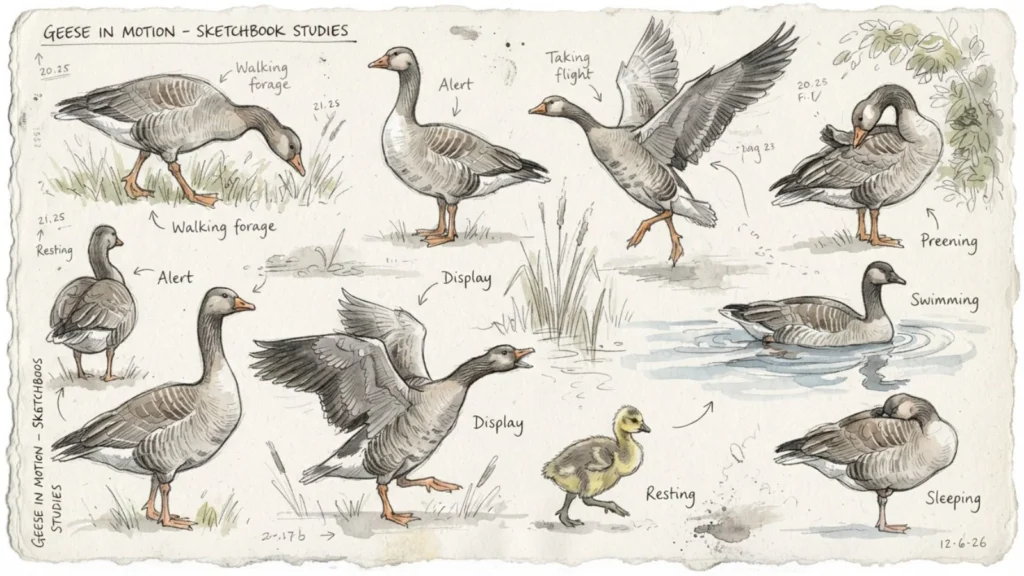
Once you’re comfortable with the standard standing pose, expanding into different poses will make your goose drawings feel more dynamic and give you more versatility as an artist.
Standing/walking goose: Keep the “S” neck curve upright and alert with one leg forward and slightly bent to suggest mid-stride motion while the other remains planted for balance.
Swimming goose: Lower the body so it sits horizontally with the waterline cutting across the lower third of the belly. Legs disappear beneath the surface so focus instead on a gentle reflection and small ripples to sell the water’s presence.
Goose in flight: This pose requires the most structural change. Stretch the neck forward in a straighter line rather than the resting “S” curve extend the wings fully with visible primary feathers fanned out and angle the legs backward tucked close to the body for aerodynamics.
Honking/head-up alert pose: Exaggerate the neck’s upward stretch with the beak often open. This pose works well for capturing personality and drama especially in wildlife-style illustrations.
Sitting/nesting goose: Compress the body shape lower to the ground tucking the legs beneath and folding the neck into a tighter more relaxed curve. This pose emphasizes roundness and softness over the alertness of standing poses.
Style Variations
Once you’ve mastered the fundamentals of goose anatomy and structure you can start adapting your drawing approach to different artistic styles each offering a distinct way to interpret the same subject.
Realistic/detailed style: This approach stays true to accurate proportions, detailed feather texture and careful shading as covered in the previous steps. It’s ideal for wildlife illustration, nature journaling or portfolio pieces meant to showcase technical skill.
Simplified cartoon style: Here you can exaggerate key features for charm and personality: a rounder body, a larger head relative to the body, bigger expressive eyes or an extra-curvy neck. Feather detail is minimized or replaced with simple color blocks making this style popular for children’s books mascots or quick character sketches.
Line art/minimalist style: This style strips the drawing down to clean confident outlines with little to no shading or feather texture. A single continuous line or a few well-placed strokes can capture the essence of a goose’s silhouette making this approach popular for logos tattoo designs or modern minimalist wall art.
Watercolor or digital painting approach: Rather than relying on line work and hatching this style builds form through color and soft edges. Layer light base washes first then add deeper tones for shadows and feather groupings keeping edges loose and blended rather than sharply defined. Digital painting follows similar principles using soft brushes to blend transitions smoothly.
Common Mistakes to Avoid
Even with a solid understanding of goose anatomy and technique certain mistakes tend to trip up artists at every skill level. Being aware of these pitfalls ahead of time can save you a lot of frustration and erasing.
A stiff or overly straight neck is by far the most common issue. Since the neck’s graceful “S” curve is what defines a goose’s silhouette, drawing it too straight or angular instantly makes the whole pose look unnatural and lifeless. Always double-check that your curve flows smoothly from head to shoulders before moving forward.
Incorrect leg placement is another frequent problem. Legs positioned too far forward or backward relative to the body’s center of gravity will make a standing goose look off-balance or like it’s about to tip over. Remember that legs should sit roughly beneath the midpoint of the body for a stable believable stance.
Overworking feather detail too early can also derail a drawing. Adding intricate feather texture before your basic proportions and outline are finalized often leads to wasted effort since any structural corrections mean erasing carefully rendered detail. Always lock in your shapes first.
Finally ignoring perspective when drawing the head and bill angle is an easy trap especially when working from a straight-on reference photo but placing the head at a turned angle. Make sure the bill’s shape and the eye placement adjust naturally to match the head’s rotation rather than looking pasted on from a different viewpoint.
Tips for Practice

Like any drawing skill, getting comfortable with geese takes repetition but practicing intentionally will get you there far faster than simply redrawing the same reference over and over.
Start with quick gesture sketches. Before attempting a detailed finished drawing, spend a few minutes doing rapid 30-second to 2-minute sketches focused purely on capturing the neck curve, body angle and overall pose. This builds muscle memory for goose proportions without the pressure of perfection.
Study live geese or video references whenever possible. Photos are useful but they freeze a single moment and can sometimes distort proportions due to angle or lens effects. Watching geese move how their neck shifts while walking and how their wings fold when settling gives you a much richer understanding of natural posture than static images alone.
Break down photos into basic shapes before detailing. Even experienced artists benefit from this habit. Before diving into feathers and shading take thirty seconds to identify the core oval circle and curve underlying any reference photo. This keeps your proportions accurate from the start.
Build a personal reference library. Save a folder of goose photos from different angles, species and poses standing swimming and flying feeding. Having this on hand means you’ll never be stuck guessing when you want to draw a pose you haven’t practiced before.
Consistent focused practice using these methods will steadily improve both your accuracy and your confidence with this subject.
Conclusion
Drawing a goose might have seemed daunting at first glance with its long curving neck and layered feathers but as you’ve seen breaking it down into manageable steps makes the whole process approachable.
From establishing the basic egg-shaped body and that all-important “S” curve to building out structural details, refining your outline layering feather texture and finally adding shading for depth, each stage builds naturally on the last to create a confident finished drawing.
Remember that mastering any subject in art is rarely about getting it perfect on the first try. The goose’s graceful neck alert eyes and distinctive silhouette take practice to internalize and that’s completely normal.
Don’t be discouraged if your early attempts feel stiff or slightly off even experienced artists revisit fundamentals regularly.