Standing in the aisle of a landscaping supply store or scrolling through an online delivery form, you’ve probably hit the same wall: how much material do I actually need.
If you’re spreading mulch over a garden bed, pouring a concrete patio, or hauling in topsoil for a new lawn, the answer almost always comes back in the same unit cubic yards.
It sounds like something out of a math class, but the good news is that figuring cubic yards takes nothing more than a tape measure, a calculator, and one simple formula.
Get it wrong, and you’re either paying for wasted material or making a second frustrating trip to restock mid-project.
Get it right, and you’ll order exactly what you need, save money, and finish the job without a hitch. This guide breaks the process down step by step, so you’ll never have to guess again.
What Is a Cubic Yard?
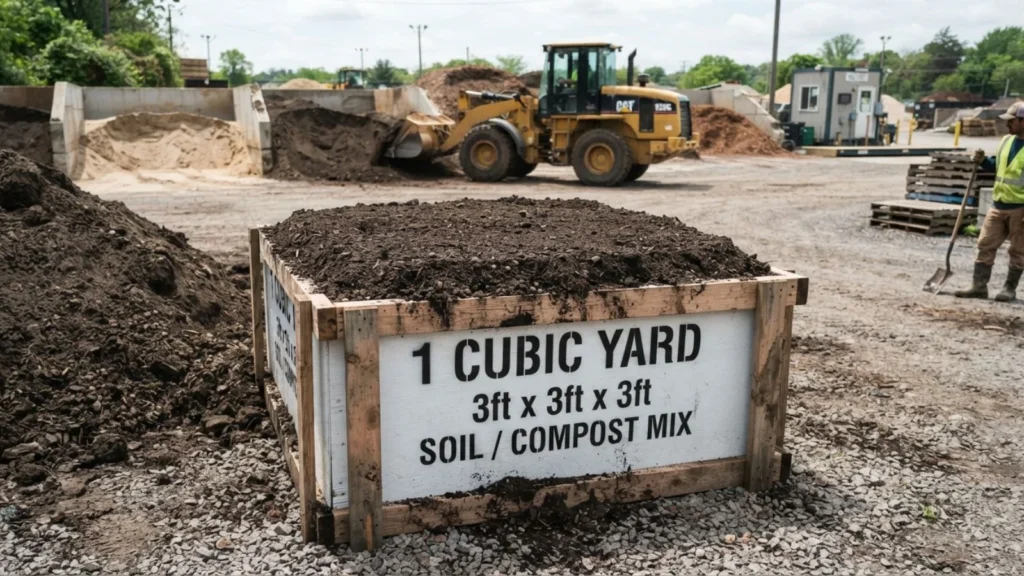
Before you can calculate cubic yards, it helps to actually picture one. A cubic yard is a unit of volume specifically, it’s the amount of space inside a cube that measures 3 feet long, 3 feet wide, and 3 feet tall. Multiply those three dimensions together (3 × 3 × 3) and you get 27 cubic feet, which is exactly what one cubic yard equals. That number 27 is the key conversion factor you’ll use in almost every calculation going forward.
To put it in more everyday terms, a cubic yard of material is roughly the size of a large washing machine, or about what fits in the bed of a full-size pickup truck (though most trucks can only haul 2–3 cubic yards safely at a time, depending on the material’s weight). If you’re ordering mulch, that’s enough to cover a 100-square-foot bed at about 3 inches deep.
Bulk materials like mulch, topsoil, gravel, sand, and concrete are sold by the cubic yard because it’s a practical, standardized way to measure large volumes. Buying “by the bag” makes sense for small touch-up jobs, but once a project requires filling beds, covering large areas, or pouring slabs, suppliers switch to cubic yards to simplify pricing and delivery logistics.
Understanding this baseline unit is the foundation for everything else in this guide. Once you know what a cubic yard actually represents, the formulas for calculating it start to make a lot more intuitive sense.
Tools You’ll Need
Before you start measuring, gather a few basic tools, nothing specialized or expensive. Having the right setup from the start makes the whole process faster and reduces the chance of measurement errors that can throw off your final calculation.
Tape measure or measuring wheel. For most residential projects, a standard 25- or 50-foot tape measure works fine. If you’re measuring a larger area like a big backyard or a long driveway a measuring wheel can save you time and make the process easier to manage solo.
Calculator. The math involved is simple multiplication and division, but a calculator (your phone works perfectly) helps avoid small arithmetic mistakes, especially when converting inches to feet or working with decimals.
Stakes and string (for irregular areas). If you’re measuring a space that isn’t a clean rectangle like a curved garden bed or an oddly shaped yard, stakes and string help you mark out straight lines and clear sections, making it easier to break the space into measurable shapes.
Graph paper or a notepad. Sketching the area you’re measuring, even roughly, helps you visualize how to divide it into rectangles, circles, or triangles later on. It also gives you a place to jot down measurements as you go, rather than trying to hold multiple numbers in your head.
None of these tools require special skill to use. With just a tape measure and a calculator, you can accurately measure and calculate cubic yards for the vast majority of home projects.
The Core Formula
Once you’ve got your measurements in hand, calculating cubic yards comes down to a single formula:
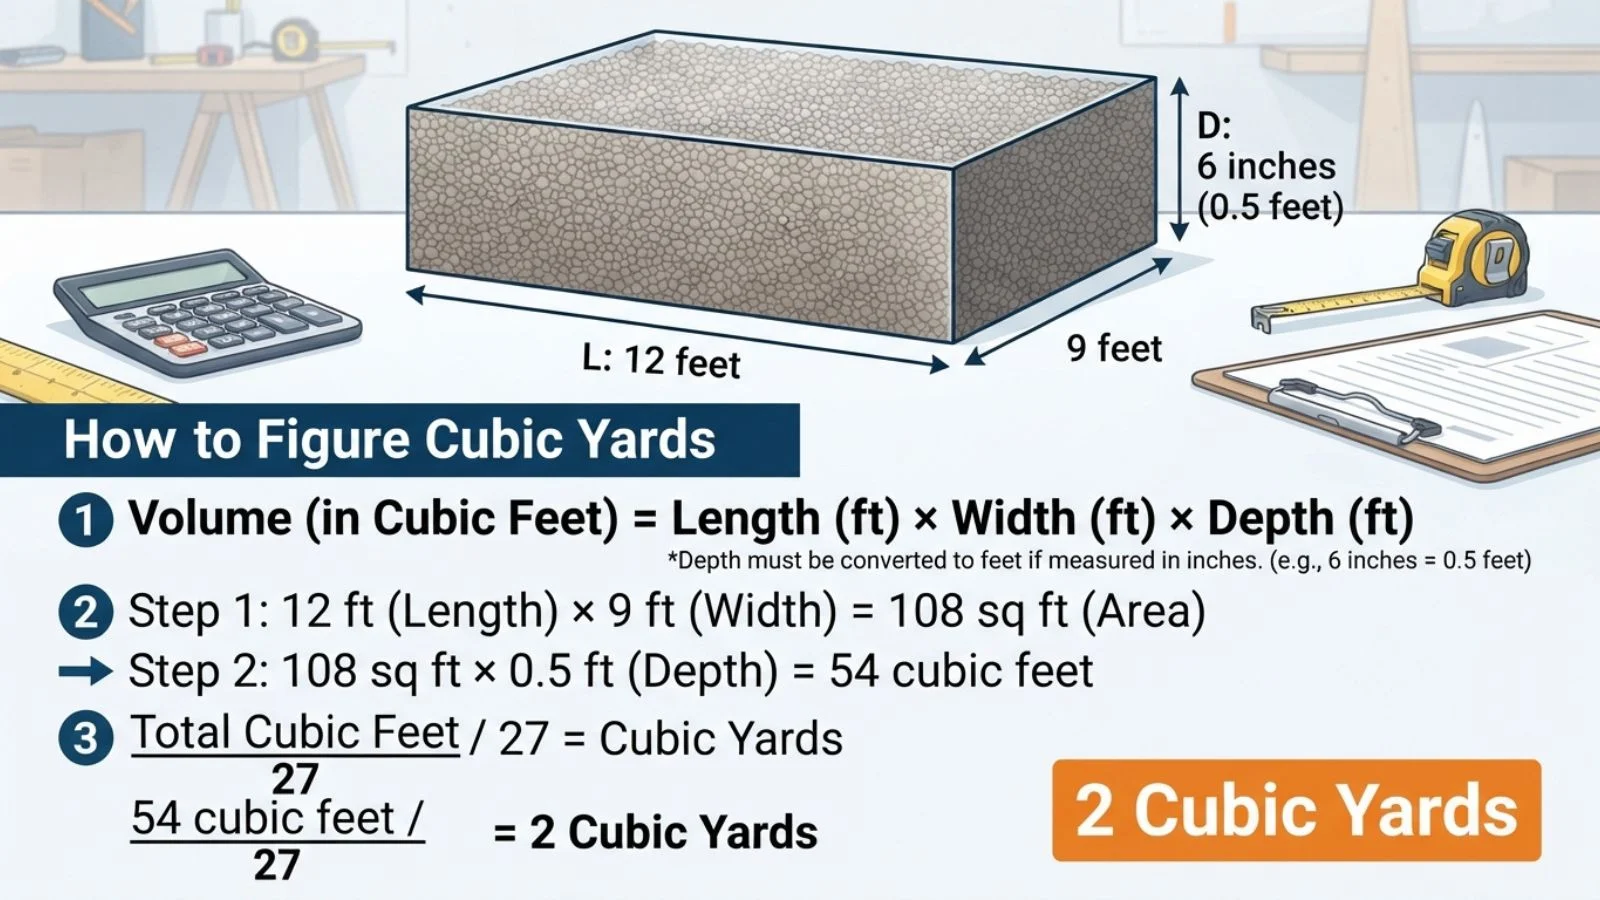
Length × Width × Depth ÷ 27 = Cubic Yards
That’s it three measurements multiplied together, then divided by 27 to convert the result from cubic feet into cubic yards. It works because length × width × depth gives you the volume of the space in cubic feet, and since one cubic yard equals 27 cubic feet, dividing by 27 converts that raw number into the unit suppliers actually sell by.
The part that trips people up most often isn’t the math itself, it’s the units. This formula only works correctly when all three measurements are in feet. Length and width are usually easy, since most people naturally measure larger spaces in feet. Depth, though, is almost always given or thought of in inches as a “3-inch layer of mulch” or a “4-inch concrete slab,” for example. If you plug inches directly into the formula without converting first, your final number will be wildly inflated, sometimes by a factor of 12.
So before doing any multiplication, take a moment to convert your depth measurement into feet by dividing the inch value by 12. Once everything is in the same unit, the formula does the rest of the work for you, no complicated math, just careful setup.
In the next section, we’ll walk through this formula step by step with a real example, so you can see exactly how it comes together in practice.
Step-by-Step Walkthrough (Rectangular Area)

Let’s put the formula into practice with a real example: covering a garden bed with mulch.
Say your garden bed measures 10 feet long and 5 feet wide, and you want to spread mulch 3 inches deep.
Step 1: Convert depth from inches to feet.
Since the formula requires all measurements in feet, divide the depth in inches by 12.
3 ÷ 12 = 0.25 feet
Step 2: Multiply length × width × depth.
Now plug all three measurements into the formula.
10 × 5 × 0.25 = 12.5 cubic feet
Step 3: Divide by 27 to convert to cubic yards.
12.5 ÷ 27 ≈ 0.46 cubic yards
So this garden bed needs approximately half a cubic yard of mulch. Simple as that.
A few common mistakes to watch for at this stage:
- Forgetting to convert inches to feet. This is the single most frequent error. Plugging “3” directly into the formula instead of “0.25” will give you a wildly inflated result.
- Mixing units. Make sure length, width, and depth are all in feet before you multiply, don’t accidentally mix feet and inches in the same calculation.
- Rounding too early. Try to carry decimals through the full calculation rather than rounding your depth conversion first, to keep your final number as accurate as possible.
Once you’ve got this basic rectangular calculation down, you’re ready to apply the same logic to more complex shapes starting with the inches-to-feet conversion table in the next section.
Inches-to-Feet Conversion Reference
Since depth is almost always the measurement that trips people up, it helps to have a quick reference table on hand rather than doing the division from scratch every time. Below are the most common depth measurements used in landscaping and construction projects, already converted from inches to feet.
| Inches | Feet |
| 1″ | 0.083 |
| 2″ | 0.167 |
| 3″ | 0.25 |
| 4″ | 0.333 |
| 5″ | 0.417 |
| 6″ | 0.5 |
| 8″ | 0.667 |
| 10″ | 0.833 |
| 12″ | 1.0 |
To use this table, simply find your intended depth in the left column, then plug the corresponding decimal value into the core formula in place of manually dividing by 12.
A couple of notes on precision: these values are rounded to the nearest thousandth, which is accurate enough for virtually any home or landscaping project. If you’re working on a large-scale job, a commercial pour, a long driveway, or anything where even small errors compound into significant cost differences it’s worth carrying out the division to more decimal places rather than relying on rounded figures.
Also keep in mind that depth doesn’t always need to be a whole or “clean” number. If your project calls for a 2.5-inch layer, for example, just divide 2.5 by 12 directly (≈0.208 feet) rather than trying to average two rows from the table.
With this reference in hand, you can move quickly through calculations without pausing to do inch-to-foot math by hand each time.
Calculating Circular or Round Areas
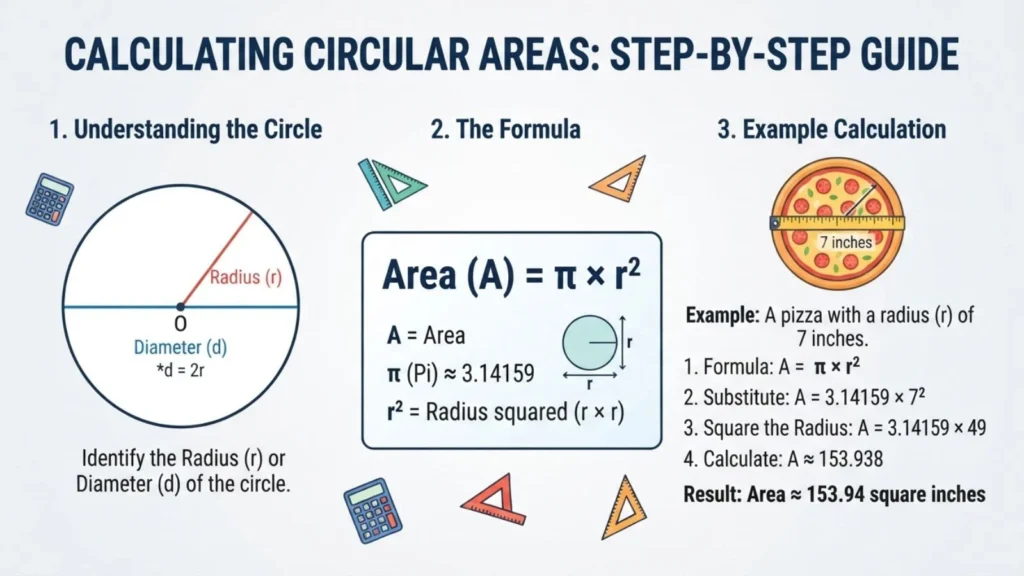
Not every space you’re covering is a neat rectangle. Round flower beds, tree rings, and circular patios all require a slightly different formula, one based on the area of a circle rather than a simple length-times-width calculation.
The formula is:
π × radius² × depth ÷ 27 = Cubic Yards
Here, π (pi) is approximately 3.14, and the radius is half the diameter of your circular area, not the full width across. This is one of the most common mistakes people make with this formula, so it’s worth double-checking: measure the distance across the widest point of the circle, then divide that number by two to get the radius.
Working example: Let’s say you’re filling a circular tree ring with mulch. The bed has a 4-foot radius, and you want the mulch 4 inches deep.
Step 1: Convert depth to feet.
4 ÷ 12 = 0.333 feet
Step 2: Square the radius.
4 × 4 = 16
Step 3: Multiply by π.
16 × 3.14 = 50.24
Step 4: Multiply by depth.
50.24 × 0.333 ≈ 16.73 cubic feet
Step 5: Divide by 27.
16.73 ÷ 27 ≈ 0.62 cubic yards
So this tree ring would need roughly 0.62 cubic yards of mulch.
This same formula applies to any circular space, a round garden bed, a circular paver base, or a small pond excavation as long as you accurately measure the radius and depth first.
Calculating Triangular Areas
Triangular spaces come up more often than you might expect corner garden beds, sloped sections of a yard, or oddly angled plots where a rectangle simply doesn’t fit the shape. Fortunately, the formula only requires one small adjustment from the rectangular calculation you already know.
The formula is:
(Base × Height ÷ 2) × Depth ÷ 27 = Cubic Yards
Here, “base” and “height” refer to the two straight sides of a right triangle that meet at a 90-degree angle, not the slanted side (the hypotenuse). Multiplying base × height gives you the area of a full rectangle, and dividing by 2 gives you the area of the triangle that makes up half of it.
Working example: Say you have a triangular corner bed with a base of 6 feet and a height of 4 feet, and you plan to add topsoil 6 inches deep.
Step 1: Convert depth to feet.
6 ÷ 12 = 0.5 feet
Step 2: Calculate the triangle’s area.
(6 × 4) ÷ 2 = 12 square feet
Step 3: Multiply by depth.
12 × 0.5 = 6 cubic feet
Step 4: Divide by 27.
6 ÷ 27 ≈ 0.22 cubic yards
So this bed would need about 0.22 cubic yards of topsoil.
Triangular calculations become especially useful when combined with rectangular and circular ones; many yards and gardens aren’t a single clean shape, but a combination of several. That’s exactly what we’ll tackle in the next section: irregular, multi-part spaces.
Handling Irregular or Multi-Section Spaces
Most real-world yards and gardens aren’t a single clean rectangle, circle, or triangle; they’re a combination of shapes, with curves, corners, and odd angles all mixed together. The good news is you don’t need a special formula for irregular spaces. Instead, you break the area down into smaller, simpler shapes you already know how to calculate, then add the results together.
Step 1: Sketch the space. Grab graph paper or a notepad and draw a rough outline of the area you’re measuring. It doesn’t need to be perfectly to scale, just accurate enough to identify natural dividing lines.
Step 2: Divide it into sections. Look for ways to split the shape into rectangles, circles, and triangles. An L-shaped garden bed, for example, can usually be split into two rectangles. A yard with a curved edge might combine a rectangle with a half-circle.
Step 3: Measure and calculate each section separately. Use the appropriate formula for each shape rectangular, circular, or triangular and calculate the cubic yards needed for that section individually.
Step 4: Add the totals together. Once you have a cubic yardage figure for each section, simply sum them up for your final total material need.
This section-by-section approach works for almost any shape, no matter how complex. It also has a practical benefit: if you’re ordering different materials for different parts of the space (say, gravel for a path and mulch for a bed), calculating separately keeps those totals cleanly organized from the start.
Material-Specific Considerations
While the formulas for calculating cubic yards stay the same regardless of material, the depth you plug into those formulas should change depending on what you’re spreading or pouring. Using the wrong depth for a given material is one of the most common reasons people end up ordering too much or too little.
Mulch. Most landscaping experts recommend a depth of 2 to 4 inches. Less than that breaks down too quickly and doesn’t suppress weeds effectively; more than 4 inches can suffocate plant roots and trap excess moisture.
Topsoil. For lawns, 4 to 6 inches is typical when establishing new grass. For garden beds, especially raised ones, depths often run deeper 6 to 12 inches or more, depending on what you’re planting.
Gravel and decorative rock. A standard depth is 2 to 4 inches for pathways and decorative areas, though base layers under pavers or driveways may call for deeper coverage.
Concrete. Slab thickness is more standardized by use: 4 inches is typical for walkways and patios, while driveways generally require a minimum of 4 to 6 inches to handle vehicle weight.
Sand. Often used as a leveling or base layer, sand depths are usually thinner around 1 to 2 inches when placed beneath pavers or artificial turf.
The takeaway: don’t assume a “standard” depth applies across every material. Always check the recommended depth for your specific project type before running your calculation, since even small depth differences can significantly change your total cubic yardage.
Accounting for Compaction and Settling
One detail that catches a lot of people off guard is that the material you order isn’t always the same volume once it’s in place. Loose, freshly delivered material and compacted, settled material can differ significantly in volume and if you don’t account for this, you may end up short even after doing your calculations correctly.
Here’s why: materials like soil, gravel, and sand are often delivered in a loose, aerated state. Once they’re spread, walked on, rained on, or naturally settled over time, the particles pack more tightly together, reducing the overall volume. Gravel, for instance, can compact by 10 to 15% once it settles and is driven or walked over repeatedly. Loose topsoil can settle by a similar margin as it absorbs moisture and beds down.
Mulch behaves a bit differently; it doesn’t compact in the same mechanical sense, but it does decompose and break down over time, meaning the depth you spread today will gradually thin out over the following months.
Rule-of-thumb compaction estimates:
- Gravel: 10–15% volume reduction after settling
- Topsoil: 10–20% volume reduction after settling
- Sand: 5–10% volume reduction after settling
If your project depends on maintaining a specific finished depth like a base layer under pavers it’s worth calculating your cubic yardage using your target depth, then adding an extra 10–15% to account for compaction after installation. This ensures the finished result still meets your original depth requirement.
Why You Should Order Extra

Even with a perfectly accurate calculation, it’s smart to order a bit more material than your math suggests. Most experienced contractors and landscapers recommend adding a buffer of 5 to 10% on top of your calculated cubic yardage and for good reason.
Uneven ground. Very few real-world surfaces are perfectly flat. Slight dips, slopes, or grading inconsistencies mean some areas will require slightly more material than others to reach your target depth, even if your overall measurements were accurate.
Spillage during transport and spreading. Whether you’re wheelbarrowing mulch across a yard or shoveling gravel off a delivery pile, some material inevitably gets lost along the way spilled on the driveway, left in the truck bed, or scattered outside the intended area.
Measurement error. Even careful measurements can be off by an inch or two, especially on irregular or hard-to-access areas. A small buffer helps absorb these minor inaccuracies without derailing your project.
Compaction and settling, covered in the previous section, is another reason a buffer matters especially for base layers or structural applications where finished depth is critical.
Let’s revisit the mulch example from earlier: our exact calculation came out to 0.46 cubic yards. Adding a 10% buffer brings that up to roughly 0.51 cubic yards in practical terms, most people would simply round up and order 0.5 to 0.55 cubic yards to be safe.
Ordering slightly more material costs a little extra upfront, but it’s almost always cheaper and far less frustrating than running a short mid-project and having to arrange a second delivery.
Converting Between Units
While the core formula covers most situations, you’ll occasionally need to convert between other units whether you’re working from a supplier’s specs, a metric measurement, or bagged product at a hardware store. Here are the conversions worth keeping handy.
Cubic feet to cubic yards. Since one cubic yard equals 27 cubic feet, simply divide your cubic feet total by 27. This is useful if you’ve already calculated volume in cubic feet for another reason and just need the final conversion step.
Cubic inches to cubic yards. One cubic yard equals 46,656 cubic inches (36 × 36 × 36). Divide your cubic inch figure by 46,656 to get cubic yards. This conversion is rarely needed for everyday projects but can come up in precise construction or manufacturing contexts.
Cubic meters to cubic yards. If you’re working with a supplier that quotes material in metric units common with imported materials or international projects, multiply cubic meters by 1.308 to get cubic yards. Going the other direction, divide cubic yards by 1.308 to get cubic meters.
Bags of material to cubic yards. For smaller DIY jobs, materials like mulch, soil, and gravel are often sold in bags rather than bulk. A standard 2 cubic foot bag equals about 0.074 cubic yards, meaning it takes roughly 13.5 bags to equal one full cubic yard. This conversion helps you decide whether buying bagged products or ordering bulk delivery makes more financial sense for your project size.
Having these conversions on hand means you’re never stuck if your measurements or supplier quotes come in a different unit than you expected.
Using Online Calculators vs. Manual Math
With the formulas covered so far, you could calculate cubic yards for virtually any project using nothing but a tape measure and a calculator. That said, it’s worth knowing when a free online cubic yard calculator might be the faster, more convenient option and when understanding the manual math still matters.
When a calculator tool is faster. Most landscaping supply websites and home improvement retailers offer free calculators where you simply plug in length, width, and depth, and the tool instantly returns your cubic yardage. These are especially handy for quick estimates, standard rectangular spaces, or when you’re comparing material costs across a few different depth options without wanting to redo the math each time by hand.
Why the manual formula still matters. Online tools are convenient, but they’re not always available or practical. You might be standing in a yard with no signal, working with an irregular shape a basic calculator can’t handle, or trying to double-check a number that seems off. Understanding the underlying formula means you’re never dependent on a specific website or app. You can verify any calculator’s output, adapt the math to unusual shapes, and catch mistakes before they turn into an over- or under-order.
In practice, the best approach combines both: use a calculator tool for quick, standard estimates, but keep the manual formulas in your back pocket for irregular spaces, spotty cell service, or simply peace of mind that the number you’re working with is correct.
Common Mistakes to Avoid
Even with a simple formula, small errors can throw off your final cubic yardage significantly. Here are the mistakes that come up most often and how to avoid each one.
Forgetting to convert inches to feet. This is by far the most common error. Plugging a raw inch value (like “3”) directly into the formula instead of the converted feet value (“0.25”) will inflate your result by a factor of 12, leading to a wildly oversized order.
Measuring diameter instead of radius for circles. When calculating circular areas, it’s easy to accidentally use the full width across a circle rather than half of it. Always double-check that you’re using the radius, not the diameter, before squaring it in the formula.
Not accounting for slopes or uneven depth. Real-world spaces are rarely perfectly flat. If part of your area is deeper or shallower than the rest, calculating with a single average depth across the whole space can lead to shortfalls in the deeper sections.
Underestimating and having to reorder mid-project. Skipping the recommended 5–10% buffer might save a small amount upfront, but running a short mid-project usually costs more in the long run, an extra delivery fee, a delay in finishing the job, or settling for a less-than-ideal patch job with mismatched material.
Mixing units within the same calculation. Make sure length, width, and depth are all expressed in feet before multiplying combining feet and inches in the same formula, even by accident, throws off the entire result.
Avoiding these pitfalls is mostly about slowing down and double-checking your units and measurements before finalizing an order.
Quick-Reference Summary / Cheat Sheet
If you only remember one thing from this guide, remember this: Length × Width × Depth ÷ 27 = Cubic Yards and always convert your depth from inches to feet first by dividing by 12.
Core formulas at a glance:
- Rectangle: Length × Width × Depth ÷ 27
- Circle: π × Radius² × Depth ÷ 27
- Triangle: (Base × Height ÷ 2) × Depth ÷ 27
- Irregular shapes: Break into rectangles/circles/triangles, calculate each separately, then add totals
Inches-to-feet quick conversions:
| Inches | Feet |
| 2″ | 0.167 |
| 3″ | 0.25 |
| 4″ | 0.333 |
| 6″ | 0.5 |
| 12″ | 1.0 |
Other handy conversions:
- Cubic feet → cubic yards: divide by 27
- Cubic meters → cubic yards: multiply by 1.308
- 2 cu. ft. bag ≈ 0.074 cubic yards (≈13.5 bags per cubic yard)
Don’t forget:
- Always measure radius, not diameter, for circles
- Add a 5–10% buffer for spillage, uneven ground, and measurement error
- Add extra for compaction if the material will be walked on, driven over, or used as a base layer
- Match your depth to the material mulch, soil, gravel, and concrete all have different standard depths
Bookmark this section as your go-to reference next time you’re planning a delivery between the formulas and conversion tables, you’ll have everything you need to calculate accurately without digging back through the full guide.
Conclusion
Figuring cubic yards might sound like a job for a contractor or a mat wiz, but as you’ve seen throughout this guide, it really comes down to one core formula length × width × depth, divided by 27 applied thoughtfully to whatever shape and material you’re working with.
Once you understand why that formula works, adapting it to circles, triangles, and irregular multi-section spaces becomes a matter of breaking a problem down rather than learning something new each time.
The real value of knowing this math isn’t just getting the right number once. It’s the confidence that comes with being able to walk into any project: a mulch bed, a gravel path, a concrete patio, a truckload of topsoil and know exactly how much material to order without guessing, overspending, or scrambling for a second delivery halfway through.
Add in a reasonable buffer for spillage and settling, double-check your units before you multiply, and you’ll rarely be caught short.